D4DME – Display Selected Recipe

The final addition that I made to our website was the ability to click on one of the recipe titles and be taken through to a more detailed view of the chosen recipe. To do this, I had to create an id based link to the individual recipe.

<h1>
<a href="selected_recipe.php?recipe_id=<?php echo ($row["recipe_id"]); ?>">
<?php echo ($row["recipe_title"]); ?>
</a>
</h1>

This then linked to the specific recipe page with the corresponding id via this block of code:

<?php
if(isset($_GET["recipe_id"])) {
$recipeID = $_GET["recipe_id"];
} else {
redirectTo("index.php");
}
?>
<br>
<?php 
$result = GetSingleRecipe($recipeID);
while($row = mysqli_fetch_assoc($result)) {
include 'recipe_large.php';
}
?>

As you can see, the include function has changed to include ‘recipe_large.php’ rather than the standard ‘recipe.php’. This file contains more information on the recipe and it much larger in screen size.
D4DME – Content Visibility (Based on Session)

Once Kyle had created the session for our site, the next stage was to make certain content hidden unless the session was active. The main element in question is the ‘submit your own’ button that leads the user to the recipe form. Our website allows all users (signed in or not) to view and filter the recipes, but only members who are logged in may submit their own to the database.

<?php if(isset($_SESSION["user"])) { ?>
<a href="submit.php">CREATE YOUR OWN</a>
    <?php } else { ?>
    <?php } ?>               

This code makes it so that only someone logged in via the session can view the button. I repeated this with several different functions that I made such as a ‘delete post’ button and a ‘my recipes’ page.

For the ‘delete post’ button, I had to link up two columns from the two tables (recipe and user) in order to make the option show. The columns ‘recipe_user_id’ and ‘user_id’ had to match for this to be an option to the user.

<?php if(isset($_SESSION["user"])) { ?>
    <?php if ($_SESSION["user_id"]==$row["recipe_user_id"]) {?>
        <div class="delete"><a href="delete_recipe.php?recipe_id=<?php echo $row["recipe_id"]; ?>" class="buttonExample">Delete?</a></div>
    <?php } ?>
    <?php } else { ?>
    <?php } ?>
</div>

The query was fairly straight forward for this button to work.

$query = "DELETE FROM recipe WHERE recipe_id = '{$postID}' and recipe_user_id = '{$_SESSION['user_id']}'";

For the ‘my recipes’ page, all I had to do was tweak the main query on the index page to only select recipes created by the user.

 $query = "SELECT * FROM recipe WHERE recipe_user_id = '{$_SESSION['user_id']}'";

D4DME – Filtering the Data

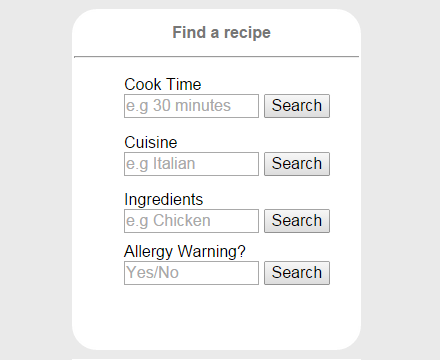
Another important function for the user will be to have choice over what type of recipes they want to view. In order to make this happen, I needed to create a set of filters that the user can refine based on the different columns in the recipe table.

Untitled2

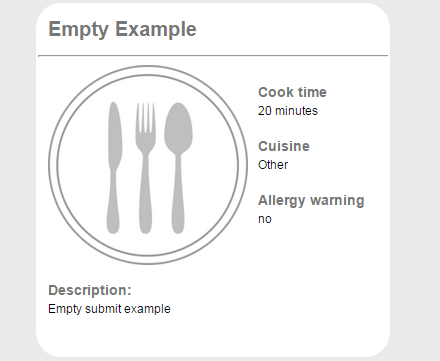
Screenshot of my submit form

The four columns that the user can filter through are ‘Cook Time’, ‘Cuisine’, Ingredients’, and ‘Allergy Warning’. It would be very easy to add extra filters such as a ‘Vegetarian’ option if we needed to, though for now I wanted to keep it simple.

<form method="get" name="cuisine" action="index.php">
      <label><strong>CUISINE</strong></label><br>
      <input type="text" name="cuisine" placeholder="e.g Italian" size="10" maxlength="120">
      <input type="submit" value="Search">
</form>

The main difference between this type of form and the previous ones I created is that this one uses ‘get’ as the method rather than ‘post’. Once the query has been written, the search options will allow the user to search the database for anything that matches their entry.

<?php
    if(isset($_GET["cuisine"])) { 
        $query = "SELECT * FROM recipe WHERE recipe_culture LIKE '%{$_GET["cuisine"]}%'"; 
    } else if...

My query above shows the use of ‘Wildcards’. In this instance, I’m using the LIKE condition alongside the wildcards to make SQL search for anything that is similar the the user’s entry (e.g if they were to type in ‘ita’ into the cuisine field, it would return any recipe that was Italian).
I found out about ‘Wildcards’ from W3Schools after Kyle told me about them in a workshop.

The ‘else if’ statement repeats the above query several times for each column before the final ‘else’ statement just selects all of the data without any refinements.

D4DME – Displaying the Data

The next step in my PHP journey was to get the user-inputted data to display on the page as ‘recipe’ boxes.

$query = "SELECT * FROM recipe"; // V: The query is selecting all the data from the recipe table
	        }
			$result = mysqli_query($connection, $query);// V: defining the variable result by putting our connection variable and our query variable through a function
			if(!$result) { // V: If the query doesn't work, kill the connection and feedback to user
				die("Database query failed.");
			}
		    while($row = mysqli_fetch_assoc($result)) { // V: whilst our query works, include recipe.php to display data
		    	include 'recipe.php';
		    }

The query simply selects all of the data from the recipe table. If the result is successful, the function below splits it up into rows so that each recipe entry is a separate array.

<?php echo ($row["recipe_title"]); ?>
<?php
        if (!empty($row["recipe_image"])) { 
            $imageName = $row["recipe_image"];
        } else {
            $imageName = "images/Untitled.png";
        }
  	?>
<img src="<?php echo $imageName; ?>" />
<?php echo ($row["recipe_cooktime"]); ?>
<?php echo ($row["recipe_cuisine"]); ?>
<?php echo ($row["recipe_allergy"]); ?>
<?php echo ($row["recipe_description"]); ?>

The PHP above takes each part of the array and echos it separately, thus displaying the data in the format that we want it.

D4DME – HTML Forms (Part Four)

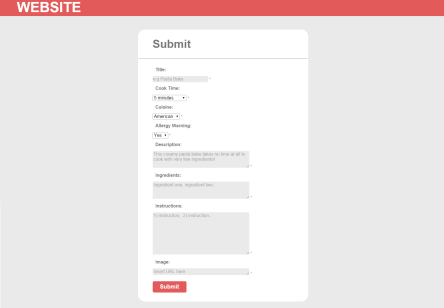
Having completed the sign-up form, all I had to do for the next one was tweak a few details.

Untitled

Screenshot of my submit form

The only things that needed to be changed were the names of the fields and certain input options (drop downs rather than text entry). Aside from this, and the change in sql queries, the code was exactly the same.

Note:

The image entry field is currently a text entry because I could not work out how to create an upload query that worked with the dakar server. I managed to make the upload function work, but it told me that I did not have the correct permissions to upload images to the database. So for now, users will have to upload their images using an external image uploader and then paste the URL into the form for it to work (otherwise there is a default image that will display if the field is empty).

Untitled1

Screenshot of my submit form

<?php
        if (!empty($row["recipe_image"])) { 
            $imageName = $row["recipe_image"];
        } else {
            $imageName = "images/Untitled.png";
        }
  	?>
    
<!-- V: The php block above is saying that if the recipe_image column is not empty then to use the URL in it, but if it is empty then use a default image -->
    <img src="<?php echo $imageName; ?>" />

D4DME – My opinion (a summary)

Over the course of this unit, I have already expressed my general opinions towards our group idea for our website. However, I thought that it would be a good idea to write a summary so that I can reflect back on everything as our work progresses.

My initial reaction to the group work was that I really wanted to take the lead on the CSS/design side of the project, though this wouldn’t have been very practical, as Chace admitted that he was struggling to learn PHP and would be more comfortable if he was allowed to start with the CSS. Obviously we are all going to make contributions to each part of the project, though initially we decided that it would be best to focus on a particular area.

The main focus for this brief is to ensure that our website is functional. The design is an added bonus, really, which I have tried to keep in mind whilst working with my team.

For this reason, I was put in charge of the PHP. As PHP is completely new to me as well, I have found some parts of this project challenging so far (as well as feeling slightly under pressure to make things work in a practical manner). It will be important for me to make sure that both my team mates understand my coding and that they can explain what is going on when we present our website in the group critique.

I was happy to go with a recipe-themed idea for our website, though the initial colour scheme did not sit well with me. I was very persistent with my team mates in saying that yellow was not a successful colour to use for our design. I managed to persuade them in the end, so overall I am satisfied with how the design is going so far.

D4DME – The Database (Part Two)

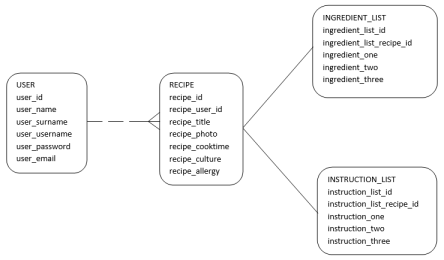
An entity-relationship diagram (ERD) is a data modeling technique that graphically illustrates an information system’s entities and the relationships between those entities.

After our group lecture on ERD and database design, I decided to have a go at planning how our database tables would look for the Starving Student page. Our website won’t be able to function properly without a solid database structure, so it’s vital that I get this part of the project up and running to make the other jobs easier for my team.

7

Screenshot of ERD in Word

8

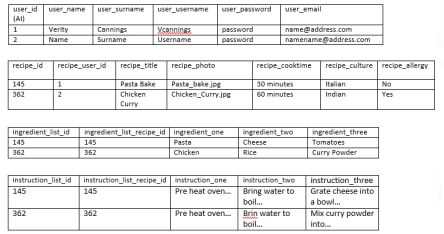
Screenshot of Database Tables in Word

The USER table contains the same fields as my previous idea on ‘D4DME – The Database’, though I have focused more on the rough design for now rather than trying to make the table in PHPMyAdmin. The RECIPE table is slightly more complicated, as it must have two derivative tables each containing relevant data. As I wasn’t particularly happy with this structure for the database, I decided to email Simon for some advice on what to do next.

References

Janssen, D. and Janssen, C., 2010. Techopedia [online].
Available from: http://www.techopedia.com/definition/1200/entity-relationship-diagram-erd [2/20/2015].

D4DME – Trial and Error

After having a discussion over Chace’s mock-up for the webpage, I created a page on our wiki to document our discussions (Here). The page consists of screenshots accompanied by an ongoing conversation that we had over Facebook. Whilst the Wiki is good to document our planning and teamwork, it doesn’t provide us with a real-time chatting option that we need to keep in touch when we’re not talking face-to-face. Facebook probably isn’t the best choice and isn’t very professional, though everyone is using it and it makes it easy to keep in touch outside of uni.

D4DME – The Website Design

As discussed in our first group meeting today (Here), Kyle and I decided to do some research into logo and icon design for our website. This is mostly Kyle’s area, as I said that I didn’t mind working on the PHP to start with if he wanted to work on the design (though I decided to give Kyle a hand as there isn’t much I can contribute until Chace creates the base code for our website). Chace was in charge of creating a mock-up of our first design idea, so in the meantime I decided to play around in illustrator to make a logo. My logo is only going to be a place holder, as Kyle is working on some more detailed designs for the actual logo.

The working title for our website is ‘Starving Students’, which is going to be a quick and easy recipe site with different filtering criteria aimed at students. This gave me a few ideas to start with, based mostly around how to represent the idea of students and food.

Untitled4

Screenshot of Illustrator

After doing a quick Google search for ‘student icon’ I found that the student hat was the most widely accepted icon to represent students. I decided to make a simple vector of the hat. My initial idea to integrate food into the design was to include a knife and fork somewhere alongside the hat, so I tried out different positions.

Untitled5

Screenshot of Illustrator

I decided to go for the top left design, as I thought that the cutlery fit nicely underneath the hat and didn’t take up any unnecessary room.

Untitled6

Screenshot of Illustrator

The last addition to the logo was a circle backdrop with a thick border to contain the icon. The colours of the logo are not final, merely place holders until we have a design for our website.

D4DME – The Wiki

To make it easier for us to keep our group work clearly distinguishable from our blog work, I suggested that we create a DocuWiki page on one of our servers. I was happy to set it up on mine, as I have 24/7 hours access to the servers (one of the many perks of living on campus).

13

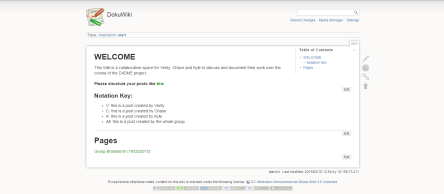
Screenshot of Our DokuWiki

In hindsight, I realised that having a full Media Wiki was more than what w actually needed it for, so I decided to remove it from my server space and replace it with a much simpler version.

We decided as a team that the DocuWiki will be used to host any information that we think of during our weekly team meetings (such as the one we had today) so that we can look back over our planning and have a constant record of what we need to do to progress our project.

Our DocuWiki can be found Here